
10 Gbit PF_RING DNA on Virtual Machines (VMware and KVM)
As you know, PF_RING DNA allows you to manipulate packets at 10 Gbit wire speed (any packet size) on low-end Linux servers. As virtualization is becoming pervasive in data-centers, you might wonder whether you can benefit of DNA on virtualized environments. The answer is positive. This post explains you how to use DNA on both VMware and KVM, Linux-native virtualization system. XEN users can also exploit DNA configuring using similar system configurations.
VMware Configuration
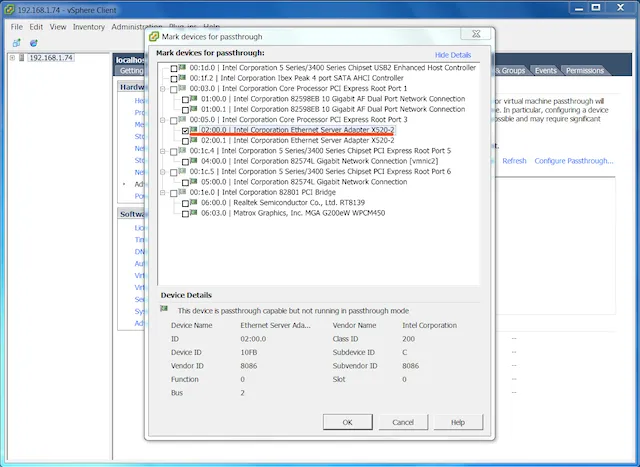
In order to use DNA, you must configure the 10G card in passthrough-mode as depicted below.
 |
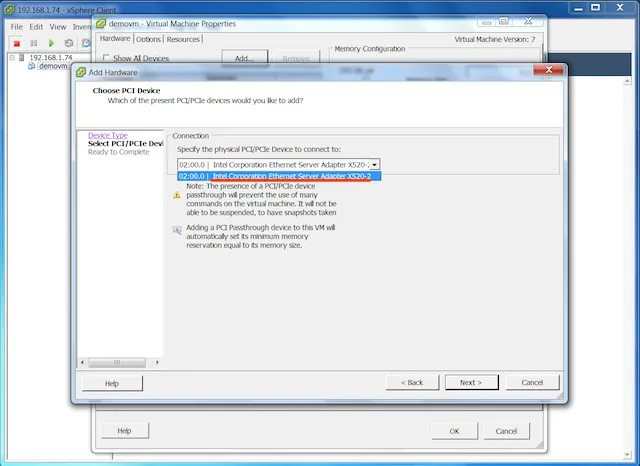 |
Once your card has been configured, it will pop-up from your VM. At this point you need to install the DNA driver that is part of the PF_RING distribution.
KVM Configuration
Under KVM you need to make sure you have enabled a few options
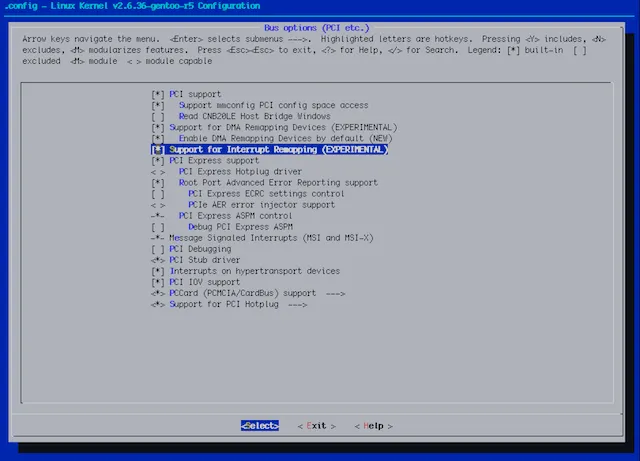 |
Modify the kernel config: $ make menuconfig Bus options (PCI etc.) [*] Support for DMA Remapping Devices [*] Enable DMA Remapping Devices [*] Support for Interrupt Remapping <*> PCI Stub driver $ make $ make modules_install $ make install Pass “intel_iommu=on” as kernel parameter. For instance, if you are using grub, edit your /boot/grub/menu.lst this way: title Linux 2.6.36 root (hd0,0) kernel /boot/kernel-2.6.36 root=/dev/sda3 intel_iommu=on Unbind the device you want to assign to the VM from the host kernel driver $ lspci -n .. 02:00.0 0200: 8086:10fb (rev 01) .. $ echo “8086 10fb” > /sys/bus/pci/drivers/pci-stub/new_id $ echo 0000:02:00.0 > /sys/bus/pci/devices/0000:02:00.0/driver/unbind $ echo 0000:02:00.0 > /sys/bus/pci/drivers/pci-stub/bind Load KVM and start the VM $ modprobe kvm $ modprobe kvm-intel $ /usr/local/kvm/bin/qemu-system-x86_64 -m 512 -boot c -drive file=virtual_machine.img,if=virtio,boot=on -device pci-assign,host=02:00.0
DNA Performance on Virtual Machines
In a previous post, we have tested the DNA performance on bare hardware. Now we’re testing the DNA performance on VMs using the same server used in the previous experiment using a Silicom PE10G2SPi-SR 10G card. This allows you to feel the difference in speed. All tests have been performed running a single VM to which we have allocated only one core (single virtual CPU) out of the 8 available on the bare hardware. Both 10G ports have been mapped to a single VM (i.e. the VM is connected to two physical 10G ports), and a fibre is connecting the ports back-to-back.
| Test (64 byte packets) | KVM | VMware ESXi 4.1 |
|---|---|---|
| pfsend/pfcount alone | ||
| (no both simultaneously) | 13’906’747.73 pps/9.35 Gbps | 13’689’510.41 pps/9.20 Gbps |
| pfsend and pfcount | ||
| (simultaneously on the same VM) | pfsend: 6’688’049.95 pps/4.49 Gbps | |
| pfcount: 5’693’580.60 pps/2’732.91 Mbit/sec | pfsend: 6’295’136.14 pps/4.23 Gbps | |
| pfcount: 5’614’627.52 pps/2’695.02 Mbit/sec |
Final Remarks
On bare hardware you can reach wire rate (14.8 Mpps), whereas on a VM we stop at 13.9 Mpps. This means that using VMs we can reach 94% of the nominal speed using minimal size packets. Considering that our physical box has 8 cores, and we allocated only one core per VM, you can guess what happens when the remaining 7 cores are used…